Sunday, October 31, 2010

Happy Halloween!


Here's another piece I created for the Artmares show in Charleston, WV. It's always fun to touch on a bit of local pop culture, so I decided to do some silly caricatures of two popular news anchors from this area, Tim Irr and Tony Cavalier. If you're from the greater WV area, southern Ohio, or eastern Kentucky, then you're probably very familiar with these guys and the WSAZ evening newscast (our local NBC affiliate.)

I was a little concerned about this piece because it's based on real people, both of whom I've met in passing, and I didn't want it to be offensive in any way. I thought it would be funny to take guys who deliver serious news to us night after night and make them look like a couple of giddy kids with their trick-or-treat bounty. I think I succeeded, but I do have to say that I got some very strange reactions to this piece. Well, maybe I shouldn't say strange as much as very specific reactions. Most people will look at a piece of art and react with "Hmm," or if you're lucky, "I really like this one." But with this piece everybody seemed to have a very unique interpretation, including people who didn't even recognize the newscasters, which was quite curious.

At any rate, a former WSAZ photojournalist bought the piece. He was a nice guy who totally got the joke, so I'm happy he enjoyed it!

Here's a pic of my pieces hanging at the show:


I had a great Halloween this year thanks in no small part to all those close to me, so here's hoping yours was a good one too.

Wednesday, October 27, 2010

8-Bit Calavera


This is my piece for the 8-Bit Calavera show at the Ground Kontrol arcade in Portland, Oregon. The show includes work from 40 artists who were asked to decorate NES cartridges in the style of traditional Dia de los Muertos skulls. NES carts are already shaped like stylized skulls, and the final pieces will be displayed in the form of a larger skull, as you can see on the invite:


I tried to loosely tie my piece into the death theme by thinking about what happens to patients in Dr. Mario if you lose a round. Do they die? Just stay sick? ...Or does Dr. Mario even have any patients? I think the plumber's legal ability to practice medicine has been in question ever since the game debuted. At any rate, Dr. Mario is one of my favorites so I decided to draw the virus characters from the game and display them by cutting a special skull-shaped mat for the front of the cartridge. I'm not much of a painter to begin with, so this was a nice way of not having to work directly on the cart itself since it has a series of ridges that create a complex surface.

Here's the digital artwork of the viruses for a better look:


If you're in the Portland area please check out the show!

Friday, October 22, 2010

Process, Part 5

Part 1 here.
Part 2 here.
Part 3 here.
Part 4 here.

This is the last of my process posts so I'll be bringing it a close by showing how I add depth to the characters with "shading."

As I've said in my other posts, there's not too much of a trick here, just drawing shapes and having a good eye for visualizing the characters in 3D space. You need to be able to predict where light will hit their bodies and where it won't. I find that I don't have to be super realistic with this or anything, I just have to do it in a way that makes sense, and from there I can have fun with it and try to come up with interesting shapes.

So how exactly did I make this:


Into this?


I started out by creating a new layer and making it around 40 to 50% transparent. Then I picked a dark color, usually a dark red or purple, and colored in the areas that I wanted to be darker. I typically use a custom brush I've made that has a bit of a chalk look to it. I really like the look of this brush and I use it on most my of work.

The dark color, when placed semi-transparently over the base color, just naturally creates a darker version of the colors beneath it. If it doesn't look quite right on a certain color then I'll go back and change it. For example, in the image above you can see how the shadow on the Mothman's T-shirt is more purple, where the shading on his skin is more turquoise.


This is the exact same shading featured in the previous image, but here I've turned the opacity back up to 100% so that you can see what the layer looks like when it has no transparency. I don't always do my shading this way; sometimes I just pick each individual darker color with no transparency added to the layer, but doing it like this is much easier on more complicated drawings, especially for things like the flannel shirt. With this method I don't have to darken each of the flannel checks individually.


Here is a subtle effect I added where I made it look like his eyes are glowing red. I made two red shapes on a new layer and then blurred them to create a glowing look.


On another new layer, I drew reflections on his eyes and some stubble on his face. I like these reflections because they are meant to be in the shape of the light bulb he's chasing, but adding the filament lines created little hearts, which also made the reflections look sort of like skulls.


Next, I added a new layer where I essentially did the same glow effect I used on his eyes, only this time I made it look like the light is illuminating his face, hand, and hat with a yellow color. I used this sparingly on all the parts of the characters that were closest to the light source, and the parts I wanted to emphasize.


This is a before and after of what I call my "cleanup layer." Most of the time I make my shapes quickly rather than carefully so that I can get a feel for where the drawing is going. So for more complicated drawings I put a new layer above all the others and use it to tidy up all my edges and things.

After all of that, I ended up with something like this:


And finally, I added some text to complete the movie poster feel...


...and I got the final image! I looked at a lot of old horror movie posters to come up with ideas for the types of logos and text I should add. I love what I call the more "classic" logo elements, like rainbow colors, globes, etc. I went to a free font site to find a good font for the movie title, and I warped the text with Photoshop to give it a more dynamic feel.

So there you have it, all my dirty little art secrets. It seems kind of weird to give out all this advice because I am entirely self taught in Photoshop, and most of the time I assume that I'm doing all this stuff in a backwards or overly complicated way.

I sincerely thank anybody who read of all these, and I encourage you to check out the past posts if you're interested and missed any. You can find the links at the top of this post.

After all is said and done, I'm very happy with this piece and I think it's on its way to becoming one of my favorites. I love that we have such a prominent folklore monster like the Mothman here in my home state of WV, and I encourage you to read more about him here. We also have the Flatwoods Monster, but that's for a future piece!

Thursday, October 21, 2010

Process, Part 4

Part 1 here.
Part 2 here.
Part 3 here.
Part 5 here.

The Photoshop portion of today's post will be...brushes! Brushes are your best friend if you're using a tablet.


This is the brush palette in Photshop where you can select your brush and set all kinds of options for it. The different brushes simulate different types of media, like paint, chalk, markers, etc, and even if they aren't always terribly realistic they can still create really cool effects. The main option I use is to set the size of my brush stroke to change with the pressure of my tablet pen. What that means is: the harder I press down with the pen, the thicker the line.


Here you can see where I have made a couple dark lines and varied their width by pressing harder or lighter as I drew them. At first I wasn't sure if I could get comfortable with this feature or would even have a use for it, but it has made line work so much easier and now I can't live without it. You can set tons of additional variables, such as changing the color of your line as you tilt the pen or roll it in your hand, but I find that one effect is enough to keep track of.

Now, back to the Mothman drawing!


What I've done here is to take my pencil drawings and put them on a single layer above my background, then alter the opacity of that layer so that I can see the background underneath. This helps me make sure that the characters are placed properly on the background, and from here I essentially just trace my pencil lines with the brush tool, putting the new lines on their own layer.


You can see how I just trace the image. Typically I do line work first, but I decided to do this drawing in a way that uses as little outlines as possible; sort of a Samurai Jack style. So instead of the dark outline you see above, I'll be drawing colored shapes and then filling them in. So just to emphasize, the black outlines you see here are to demonstrate how I outline shapes with the brush tool and are not part of the final drawing.


In this image I have most of the Mothman's body drawn in, and you can see how it's basically just a big coloring book. I used the pencil drawings as guides to draw all the shapes in, and I picked the color of each shape as I came to it. The Mothman's flannel shirt I created by drawing horizontal and vertical stripes on different layers, then making the layers slightly transparent.

I like to mess around with my colors until I get them exactly how I want them, so let's say that as I'm filling in the red of Mothman's eye I decide that the color is too dark. I would then just select that shape and lighten or darken it, change its hue, etc, until I'm happy with it.

Once I completed all the colored shapes for the entire drawing, I created a new layer and added in minimal line work to help distinguish certain shapes and make the drawing less confusing.


Here's a portion of the drawing before and after line work. Another thing you might notice here is that I lightened the part of the girl's dress where there is no body underneath, which silhouettes her legs and makes it seem as if light is shining through the fabric.

Again, this drawing is a special case because of the style it's in, and when I do "normal" pieces where everything is outlined I do the line work first and then the coloring second, on a layer below the lines.


This is a full view of the piece after all the colors and line work are completed. You can also see that I have some text in there, which I created by using the text tool and then distorting it so that it conforms to the truck door. The text on the "Welocme to West Virginia" sign I drew by hand because that was easier and more accurate than trying to match the font!

Tomorrow...shading!

Wednesday, October 20, 2010

Process, Part 3

Part 1 here.
Part 2 here.
Part 4 here.
Part 5 here.

Today I'll show you how I create a background! But first, you need to understand how layers work in Photoshop. I don't want to turn this into Photoshop 101 or anything, but I do want it to be accessible to as many people as possible, including those who may not have a full working knowledge of Photoshop or might not be artists themselves. For that reason I want to at least explain the concepts behind some of the tools I use.


Layers are a feature that you absolutely cannot live without as a digital artist. If you look to the right in the the image above, you can see that each element of the smiley face is on a different layer. Notice in the tiny icons how the facial features are on a layer above the black outline, which is above the yellow circle, which is above the white background. On the left, you can see that all of those things overlap to form a completed smiley face. Think about it like drawing on transparency sheets and laying them all on top of each other. The reason this is important is because, well, let's say that this is a painting on a canvas and you decide after you're done that you want the smiley face to be green. You would have to repaint the whole thing, carefully edging around the eyes, mouth, and outline, right? Well, with this setup the yellow circle is on it's own layer, so all you have to do is select that layer and change the color, which takes all of three seconds.

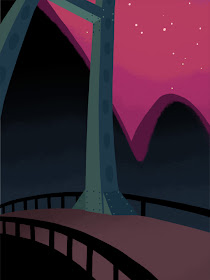
Now that we have that out of the way, back to my Mothman drawing. I tend to make my backgrounds fairly simple, so I've reached the point where I'm comfortable creating them entirely in Photoshop with no need to do much more than a thumbnail on paper. (Unless it's a particularly complicated scene or uses specific buildings, etc.) For this background I want a to draw a bridge with a mountain range behind it.


Since my scene takes place at night, I started out with an all black canvas and used a textured brush to add some very subtle color gradation from top to bottom to give it more depth. (Brushes will be in the next post, so don't panic.) My, isn't that exciting to look at? I know the gradation may seem subtle to the point of useless, but stuff like that really helps, trust me.


In a new layer, I drew a shape that would form the sky behind the mountains. Within that shape, I again created a gradation of color with a brush to give it depth. See how the slight changes in color make you think "sky" rather than just "pointy pink shape?"


I added more layers for more elements of the background, such as the road, railings, stars, bridge support, and the soft light on the edge of the mountains. There's no real trick to adding this stuff in, you just draw it in there with the brush tool, or polygon lasso tool for bigger shapes that you want to fill in quickly.


As much as I like the colors I had in the background, I was still thinking about the fact that brightly colored characters were going to be placed on top of it. For that reason I changed the colors to be much more subtle and muted so that they wouldn't compete with the characters as much. I did this by making a new layer above all the other layers and filling it with a solid color, then messing with the layer's settings and opacity. Think about it as if you have a piece of colored glass that you're looking through, only you're able to control its color and the amount of light that passes through it.

And that's the finished background! Again, there's not as much of a trick to this as you would think, it just takes all the time and work you would expect to put into a nice looking drawing

Tomorrow, the characters.

Tuesday, October 19, 2010

Process, Part 2

Part 1 here.
Part 3 here.
Part 4 here.
Part 5 here.

The first thing you need in order to create a piece of art is an idea! Right now I'm working on a drawing for a Halloween themed art show in my hometown of Charleston, WV. I wanted to make a piece that pays tribute to one of our state's urban legend creatures, the Mothman! I'll talk more about him later, but if you want to know the full story behind the Mothman sightings in WV just do a quick Google search.

The scene I had in mind was the Mothman being lured down a street by a giant light bulb on the top of an electrician's truck, and a girl in the back of the truck ready to blast him away with a shotgun. I pictured it being in the style of an old horror movie poster, complete with the title in a stereotypically creepy font.


This was the first drawing I did to get an idea of the Mothman's proportions and pose, as well as a small thumbnail of the scene itself. Not really anything too exciting. The Mothman isn't known to have a definitive appearance outside of being big and having wings and glowing red eyes, so I decided to have some fun with designing him in my own style.


This was a drawing to help me nail down the truck and the girl standing in the back, making sure I got her pose the way I wanted it.


And here's the sketch where I combined the two and made sure they fit together in a way that made sense and had good composition. It looks like a mess, I know, but I promise I know what's going on here! I probably would have done a better job if I had known I was going to be showing these off, but in a way it's good that you get to see just how sloppy some of this stuff can be.


Here's my final pencil drawing of the Mothman. These drawings just serve as a framework for the final digital piece, so they don't have to look all that great as you can see.


The girl in the back of the truck...


...and the truck itself. You may be noticing that I drew all the elements of this piece separately. This is a normal practice for me because I find it gives me more freedom when drawing the characters. For example, lets say I've drawn the Mothman and I'm starting to draw the girl on the same piece of paper, but I notice that her head is going to block a part of the Mothman's body that I want to be visible, like his hand. This might cause me to scale back her proportions in a way that compromises her design, which will ultimately make me unhappy with that part of the drawing. Drawing everything separately makes me feel like I'm free to play with the design and proportion of the characters as much as I want.


Finally, I scan all the drawings in and composite them together in Photoshop to make the scene I envisioned. I've also used Photoshop to draw in some background elements so that I know it will fit around the characters and do what I want it to. That brings us to tomorrow's topic, which will be backgrounds!

*A quick afterthought:

I feel like I should also mention that whenever I do a drawing I do lots of research and look at as many reference photos as I can. Obviously the Mothman above looks nothing like an actual moth, but I still looked at many photos of real moths for inspiration, as well as photos of old trucks and shotguns. You never find photos of things in the exact position you're looking for, but to me that's the whole point; to get an idea of the shapes objects can make and try to understand them rather than just copying a photo. In the age of Google Images there's just no reason not to do research!

Monday, October 18, 2010

Process, Part 1

Part 2 here.
Part 3 here.
Part 4 here.
Part 5 here.

From time to time I have people ask about my artistic process, so this week I've decided to do a series of posts that will show you how I create an image from start to finish. At this time the piece I'll be demonstrating with isn't finished yet, so if it turns out to be a complete disaster you'll get to watch it crash and burn with me!

First let me explain that all of my illustration work is digital unless otherwise noted. I enjoy digital because the flexibility is near infinite. Don't like a color? Change it. Screwed up a line? Erase it and leave no trace that you ever messed up. Some old-school artists feel like digital is cheating, and I probably don't need to tell you that I disagree with that severely. I think if you create a bad piece of digital work it is just as obvious as if you create a bad piece of physical work. Everybody has drawn or painted at some point in their lives, even if it was only when they were kids, but most people have never created a piece of digital art so they don't fully understand how it works. That's completely fine, but I find that the problem starts when instead of trying to learn more about it someone will get a picture in their head of a giant "MAKE ART" button on a keyboard and figure there's not much more to it than that. Everybody is entitled to their own line of thinking, however, so here's how I make stuff!

First thing's first, my setup:


I have two monitors, one is my "primary" where I view and work on the image, and the other is a "secondary" where I bring up reference photos or Hulu for entertainment while I work :D

Recently I splurged and bought a Wacom Cintiq, which is a tablet where you work directly on-screen. I had to save up and mull it over for a few years, but I finally took the plunge about a month or two ago. I have to say that it is quite the luxury item, but I want to stress that it is in no way necessary to creating digital art. For many years prior to owning this I used a normal Wacom tablet which I still love dearly. I will say that having a tablet of any type is amazingly useful, and well worth the money if you're serious about making digital art. A standard Wacom tablet (with no screen) is about $200, and I never came close to regretting a penny of it.


As you can see I use Photoshop, and right now I have version CS4. For the kind of work I do just about any version from the first CS on works just fine. I don't really use any of the fancy features or anything, and in fact probably only use about 10% of the program, including all the standard features and tools.


This is a screen grab of my typical setup. The bottom screen is my tablet where I work on the drawing, so that's where I keep my tool palette. Everything else I keep on the upper screen because of a nifty feature that lets you switch your cursor from the tablet to the rest of your desktop. Aside from my tools the only palette that I find absolutely necessary is the Layers palette; the rest I've condensed down to one or two so that I have the most work area possible on my screens. I also just figured out how to open two windows of the same file (without using the navigator) which is amazingly convenient since it allows me to see the entire composition of the image even when I'm zoomed way in, as you can see above.

If all this technical stuff means nothing to you don't worry, I'm just listing it for those who are interested. After this it gets much more into the actual process, so stay tuned for the next post!

Thursday, October 14, 2010

Two! Two Count Shirts!


My Count shirt is now available in women's sizes in addition to the already available men's sizes. A nice shirt for the Halloween season if I do say so myself.

Wednesday, October 13, 2010

Front Magazine September Issue


A new month, a new issue of Front. This time I have a full eight pages of illustration in one issue!


First up, the Evolution of Football (Soccer) feature.


Next, the How to Party Hard feature. As I mentioned when I first posted the artwork for this one, there's some adult material here so don't check the larger versions if you're at work, or overly offended by boobies. Although if that's the case I would reccomed steering clear of Front all together.

Wednesday, October 6, 2010

A Bird Catches the Bug


I'm still playing catchup with posting these SMAF shorts, so please enjoy A Bird Catches the Bug; based on an idea by puppet master Kyle Quinn!

Friday, October 1, 2010

New Prints!


The first items I've decided to make available specifically for my new store are the two prints you see above. I've gotten quite a few requests for these pieces so I'm very happy to offer them up for sale! You can buy the Fanservice print here and the Back to the Future Print here.

And again, thanks to everybody who buys my work, leaves comments, emails me, or just stops by the site to check things out. It's great to know that you guys dig what I'm doing.